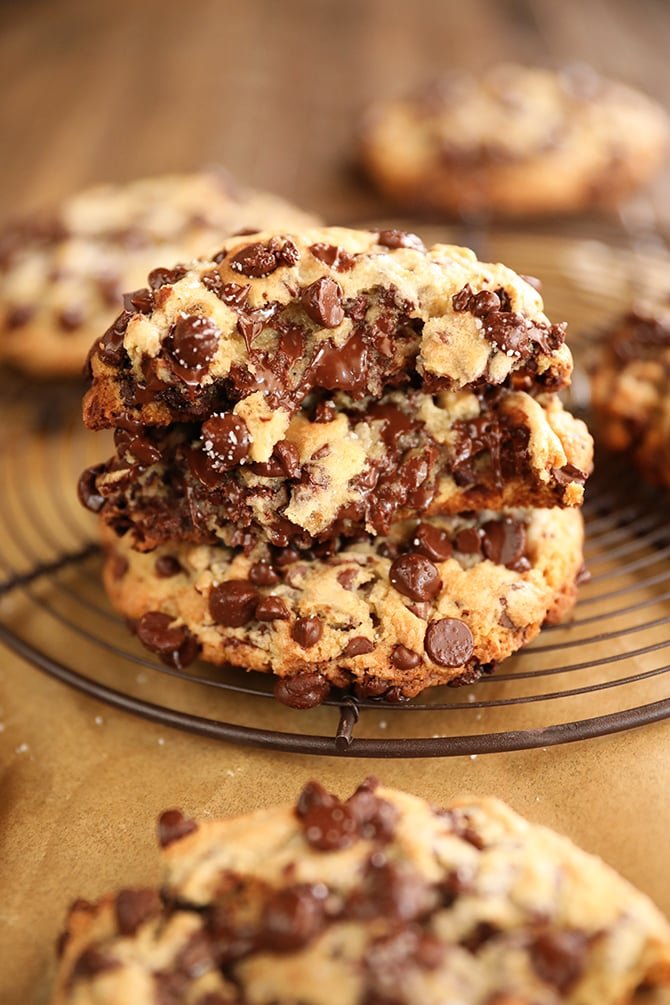
Bakery-style chocolate chip cookies are famous for their golden edges, soft and chewy centers, rich buttery flavor, and generous chocolate chunks. Although these cookies look like something purchased from a professional bakery, you can make them at home using simple ingredients and a few reliable baking techniques.
The secret to making bakery-style chocolate chip cookies is not just the chocolate or butter. The texture depends on the balance of ingredients, the temperature of the dough, the way the ingredients are mixed, and the baking time. When these elements work together, you can create thick, flavorful cookies that look attractive and taste delicious.
This recipe is suitable for home bakers who want to make cookies for family gatherings, afternoon snacks, celebrations, lunchboxes, or homemade gifts. You do not need professional baking equipment. A regular oven, a mixing bowl, a baking tray, and basic kitchen utensils are enough.
In this complete guide, you will learn how to prepare bakery-style chocolate chip cookies step by step, select the best ingredients, avoid common mistakes, achieve a soft center, and store your cookies properly.
What Are Bakery-Style Chocolate Chip Cookies?
Bakery-style chocolate chip cookies are usually larger, thicker, and richer than ordinary homemade cookies. They often contain visible chocolate chunks, slightly crisp edges, and a soft center that remains tender after cooling.
Professional bakeries pay attention to the appearance, flavor, texture, and consistency of their cookies. Their cookies may have irregular chocolate pockets, golden surfaces, and a satisfying combination of crispness and chewiness.
The good news is that you can reproduce many of these characteristics at home by following the correct recipe and baking method.
Characteristics of Perfect Bakery-Style Cookies
A successful batch should have the following qualities:
- Golden edges: The outside should be lightly browned without becoming burnt.
- Soft centers: The middle should remain tender and slightly chewy.
- Rich buttery flavor: Butter provides a delicious aroma and a satisfying taste.
- Generous chocolate: Chocolate chips or chopped chocolate should appear throughout each cookie.
- Balanced sweetness: Brown sugar, white sugar, vanilla, and chocolate should complement one another.
- Attractive appearance: The cookies should have a slightly crinkled surface and visible chocolate pieces.
- Thick texture: Properly prepared dough should spread enough to form a cookie without becoming excessively thin.
The exact texture depends on your ingredient measurements, oven temperature, and personal preference. Some bakers prefer cookies that are very soft, while others enjoy crispier edges and a more pronounced chew.
Ingredients for Bakery-Style Chocolate Chip Cookies
The following recipe makes approximately 12 large cookies or 16 medium cookies, depending on the size of each dough portion.
Ingredients List
| Ingredient | Quantity | Purpose |
|---|---|---|
| All-purpose flour | 250 g | Provides structure |
| Unsalted butter | 170 g | Creates richness and tenderness |
| Brown sugar | 150 g | Adds moisture and a caramel-like flavor |
| White granulated sugar | 80 g | Helps create crisp edges |
| Large egg | 1 | Binds the ingredients |
| Egg yolk | 1 | Adds richness and chewiness |
| Vanilla extract | 2 teaspoons | Enhances flavor |
| Baking soda | 1/2 teaspoon | Helps the cookies spread and brown |
| Baking powder | 1/2 teaspoon | Provides additional lift |
| Fine salt | 1/2 teaspoon | Balances the sweetness |
| Chocolate chips or chopped chocolate | 200 g | Provides chocolate flavor |
| Extra chocolate chunks | 30 g, optional | Creates a bakery-style appearance |
For the best results, measure ingredients using a kitchen scale. Cup measurements can vary depending on how tightly ingredients are packed, especially flour and brown sugar.
If you do not have unsalted butter, you can use salted butter and reduce or omit the additional salt according to your taste.
Choosing the Best Chocolate
Chocolate is one of the most important ingredients in this recipe. The type of chocolate you choose affects the sweetness, flavor, and appearance of the finished cookies.
Semi-sweet chocolate chips are an excellent choice because they provide a balanced flavor without making the cookies excessively sweet.
Dark chocolate chunks create a deeper chocolate flavor and are especially suitable for rich bakery-style cookies.
Milk chocolate chips produce sweeter cookies with a creamy taste. They work well if you prefer a mild chocolate flavor.
Chopped chocolate bars create irregular chocolate pockets throughout the cookies. As the chocolate melts, some pieces spread across the surface, giving the cookies an attractive homemade bakery appearance.
You can also combine two types of chocolate. For example, mixing semi-sweet chocolate chips with dark chocolate chunks creates a more complex flavor.
Avoid adding so much chocolate that the dough cannot hold together. The chocolate should be distributed throughout the dough without overwhelming its structure.
Why Brown Sugar Is Important
Brown sugar is a major contributor to the soft and chewy texture of chocolate chip cookies.
It contains molasses, which adds moisture and a mild caramel flavor. This helps create cookies that remain tender rather than becoming dry and crumbly.
Light brown sugar is ideal for a balanced flavor. Dark brown sugar can also be used if you prefer a deeper molasses taste.
White sugar serves a different purpose. It encourages browning and helps create slightly crisp edges. The combination of brown and white sugar gives the cookies a balanced texture.
Using only white sugar may produce a different texture and a less pronounced caramel flavor. Using only brown sugar may create softer cookies with a different spreading pattern.
For this recipe, the combination of both sugars is designed to produce cookies with golden edges and chewy centers.
Equipment You Need
You do not need expensive equipment to prepare professional-looking cookies at home.
Prepare the following items before starting:
- A large mixing bowl
- A medium mixing bowl
- A digital kitchen scale or measuring cups
- Measuring spoons
- A whisk or electric hand mixer
- A rubber spatula or wooden spoon
- A baking tray
- Baking parchment
- A cookie scoop or regular spoon
- A wire cooling rack
A digital kitchen scale is particularly helpful because small differences in flour and butter measurements can change how much the cookies spread.
If you do not have an electric mixer, you can mix softened butter and sugar with a sturdy wooden spoon. It may require more effort, but the recipe can still work well.
Step-by-Step Bakery-Style Chocolate Chip Cookies Recipe
Follow these instructions carefully for consistent results.
Step 1: Prepare the Ingredients
Before mixing the dough, measure all the ingredients and place them within reach.
Allow the egg to reach room temperature if possible. Room-temperature ingredients are generally easier to combine evenly.
Take the butter out of the refrigerator in advance if you plan to cream it with the sugar. The butter should be softened but not melted.
Softened butter should yield slightly when pressed with a finger while still holding its shape. If it looks oily or has liquid pooling around it, it is too warm.
Preheat your oven to 175°C (350°F). If you are using a fan-assisted oven, you may need to reduce the temperature to approximately 160–165°C, depending on your oven’s performance.
Line a baking tray with parchment paper.
Preparing everything beforehand makes the process easier and reduces the chance of forgetting an ingredient.
Step 2: Mix the Dry Ingredients
Add the all-purpose flour, baking soda, baking powder, and salt to a medium bowl.
Whisk the ingredients together until they are evenly distributed.
This step helps prevent small pockets of baking soda or salt from remaining in the finished dough.
If your flour contains lumps, sift it before mixing. Sifting is not always necessary, but it can help produce a more uniform mixture.
Set the dry ingredients aside.
Do not add the flour mixture to the butter before combining the wet ingredients. Keeping the ingredients separate at this stage makes it easier to control the dough’s texture.
Step 3: Cream the Butter and Sugars
Place the softened butter in a large mixing bowl.
Add the brown sugar and granulated white sugar.
Beat the mixture for approximately 2–3 minutes using an electric mixer on medium speed. If mixing by hand, stir vigorously until the mixture becomes creamy and evenly combined.
The mixture should look smooth and slightly fluffy, although it does not need to become as light as cake batter.
Scrape the sides and bottom of the bowl with a spatula to incorporate any butter or sugar that remains unmixed.
Do not use melted butter for this specific creaming method. Melted butter changes the dough’s structure and usually encourages more spreading.
If your kitchen is very warm and the butter begins to look greasy, refrigerate the mixture briefly before continuing.
Step 4: Add the Egg, Egg Yolk, and Vanilla
Add the whole egg to the butter-and-sugar mixture.
Add the extra egg yolk and vanilla extract.
Beat until the ingredients are combined and the mixture looks smooth.
The whole egg helps bind the dough, while the additional yolk contributes fat and richness. This can help produce a more tender, chewy cookie.
Avoid beating the mixture excessively after the eggs are incorporated. The goal is to combine the ingredients evenly, not to introduce as much air as possible.
If the mixture looks slightly separated, do not worry immediately. It may still come together when you add the dry ingredients.
Scrape the sides of the bowl again to make sure everything is evenly incorporated.
Step 5: Combine the Wet and Dry Ingredients
Add the dry ingredients to the butter mixture in two portions.
Use a spatula or wooden spoon to fold the flour into the wet ingredients.
Mix gently until most of the flour disappears.
The dough should be thick and soft rather than liquid. It may feel slightly sticky, which is normal.
Do not continue mixing once the flour has been incorporated. Excessive mixing can develop gluten in the flour, making the cookies tougher than intended.
If you are using an electric mixer, switch to a low speed or finish mixing by hand.
The dough should hold together when pressed but remain soft enough to scoop.
Step 6: Fold in the Chocolate Chips
Add approximately 200 grams of chocolate chips or chopped chocolate to the dough.
Fold them in with a spatula until they are distributed throughout the mixture.
Reserve a small amount of chocolate if you want to decorate the tops before baking.
For a bakery-style appearance, use a mixture of small chips and larger chocolate chunks. Smaller pieces distribute chocolate throughout the dough, while larger pieces create visible melted pockets.
Avoid crushing the chocolate into very fine pieces. Larger pieces provide a more satisfying texture.
Once the chocolate is evenly distributed, stop mixing.
Step 7: Chill the Cookie Dough
Cover the bowl with plastic wrap or transfer the dough to a covered container.
Refrigerate the dough for at least 1 hour. If you have more time, chilling it for 2–4 hours can help develop the flavor and make the dough easier to handle.
Chilling allows the butter to firm up and gives the flour more time to absorb moisture. This often reduces excessive spreading and can improve the final texture.
If you are preparing the dough the night before, refrigerate it in an airtight container and bake it the next day.
When the dough becomes very firm, allow it to sit at room temperature for several minutes before scooping.
Do not leave dough containing raw eggs at room temperature for extended periods.
Step 8: Shape the Cookies
Remove the chilled dough from the refrigerator.
Divide it into approximately 12 large portions, each weighing around 65–70 grams. You can make smaller cookies by using portions of approximately 40–45 grams.
Roll each portion gently into a ball.
For thicker cookies, shape the dough into slightly tall mounds rather than pressing each ball flat. This gives the cookies more height as they bake.
Place the dough portions on the prepared baking tray, leaving approximately 7–8 cm between them.
Cookies spread as the butter melts, so adequate spacing prevents neighboring cookies from joining together.
Press a few reserved chocolate pieces into the top of each dough ball.
This small step helps create the attractive chocolate-studded appearance often associated with bakery cookies.
If your tray is small, bake the cookies in multiple batches rather than overcrowding the pan.
Step 9: Bake the Cookies
Place the tray in the center of the preheated oven.
Bake large cookies for approximately 11–14 minutes. Smaller cookies may require around 9–12 minutes.
These times are estimates because oven performance and dough temperature vary.
Watch for the following signs:
- The edges should look set and lightly golden.
- The centers should look slightly soft.
- The surface may develop small cracks.
- The chocolate should appear glossy and partially melted.
- The cookies should not have dark brown or burnt edges.
Do not wait until the entire cookie looks completely firm inside the oven. Cookies continue to set from residual heat after they are removed.
If the centers look wet and the edges have not set, bake for another minute or two and check again.
If you prefer crispier cookies, extend the baking time slightly, checking frequently to avoid overbaking.
Step 10: Let the Cookies Rest on the Tray
Remove the baking tray from the oven and place it on a heat-resistant surface.
Allow the cookies to rest on the tray for approximately 8–10 minutes.
At this stage, the centers may still look soft, but the cookies will become firmer as they cool.
Moving them too early can cause them to break because the melted chocolate and warm cookie structure are still delicate.
After the initial resting period, transfer the cookies to a wire rack.
Let them cool further before stacking or storing them.
For the best texture, enjoy one when it is warm enough for the chocolate to remain soft but cool enough for the cookie to hold its shape.
The Secret to Thick Bakery-Style Chocolate Chip Cookies
Many home bakers find that their cookies spread too much or become thinner than the cookies they see in professional bakeries.
Several factors influence cookie thickness.
Use Properly Softened Butter
Butter that is too warm melts quickly in the oven. This can cause the dough to spread before the structure has time to set.
Butter that is softened but still holds its shape helps produce a more controlled dough.
If the butter is already melted, this recipe’s creaming method will not work in exactly the same way. Rather than trying to cool oily butter and treating it as softened butter, prepare a fresh batch using the recommended butter texture.
Measure Flour Carefully
Too little flour can result in excessive spreading, while too much flour may create dry, dense cookies.
For this recipe, use 250 grams of all-purpose flour.
If measuring by cups, spoon the flour into the measuring cup and level the top. Avoid pressing flour firmly into the cup.
A kitchen scale is the most reliable way to achieve consistent results.
Chill the Dough
Chilling is one of the simplest methods for improving the shape of chocolate chip cookies.
Cold dough takes longer to warm up in the oven. This gives the cookie structure more time to develop before the butter melts completely.
For particularly thick cookies, chill the dough for at least 1 hour and keep the portions tall rather than flattening them.
Avoid Greased Baking Trays
Excessive grease on a baking tray may encourage cookies to spread.
Parchment paper provides a convenient baking surface and makes it easier to remove the cookies after cooling.
Avoid placing cold dough on a hot baking tray left over from a previous batch. A hot tray can begin melting the butter before the cookies enter the oven.
Use a cooled tray for each batch.
Check Your Oven Temperature
An oven that is too cool may allow cookies to spread before they set.
An oven that is too hot may brown the edges before the centers are properly baked.
An inexpensive oven thermometer can help you identify temperature differences between the oven setting and the actual temperature.
For this recipe, begin at 175°C (350°F) in a conventional oven and adjust only if your oven consistently produces underbaked or overbaked results.
How to Make Cookies Soft and Chewy
The best soft and chewy chocolate chip cookies are moist without being raw or doughy.
The balance of ingredients and the baking method determine how the final cookies feel.
Use Brown Sugar
Brown sugar contains molasses, which contributes moisture and a caramel-like flavor.
The recipe uses more brown sugar than white sugar to encourage a chewy texture.
Add an Extra Egg Yolk
An additional egg yolk adds fat and richness without introducing as much extra egg white.
This can help create a tender texture and a fuller flavor.
Avoid Overbaking
One of the most common reasons homemade cookies become hard is excessive baking.
Remove the cookies when the edges are set and lightly golden but the centers remain slightly soft.
The cookies will continue cooking briefly on the hot tray.
Store the Cookies Properly
Once completely cool, transfer the cookies to an airtight container.
Exposure to air gradually dries them out, making them firmer and less pleasant to eat.
Store them away from direct sunlight and sources of heat.
If you prefer warm cookies, reheat an individual cookie briefly in a microwave. Start with approximately 5–10 seconds and adjust as needed.
How to Make Cookies Crispy on the Outside and Soft Inside
Some people prefer cookies with a little crunch around the edges and a soft center.
This texture is possible with the same basic recipe.
First, make sure the baking tray is not overcrowded. Adequate space allows hot air to circulate around the cookies.
Second, use the recommended combination of brown and white sugar. White sugar helps the edges develop a crisp texture, while brown sugar contributes moisture.
Third, avoid making the dough portions excessively large if you want a more pronounced contrast between the edges and the center. Medium-sized cookies often develop crisp edges more quickly than very large ones.
Finally, allow the cookies to cool on the tray before moving them. This helps the outer structure firm up.
For additional crispness, bake the cookies for a little longer, checking every minute near the end of the baking period. Be careful because a small increase in baking time can make a noticeable difference.
Common Mistakes to Avoid
Even a simple cookie recipe can produce disappointing results if important details are overlooked.
Mistake 1: Using Melted Butter Instead of Softened Butter
This recipe uses the creaming method, which depends on softened butter.
Melted butter behaves differently and may produce flatter cookies.
Solution: Allow the butter to soften naturally until it yields to gentle pressure but still holds its shape.
Mistake 2: Skipping the Chilling Step
Warm dough often spreads more quickly in the oven.
Solution: Refrigerate the dough for at least 1 hour before baking.
If you must bake immediately, keep the dough portions slightly smaller and expect a different texture. Chilling remains the preferred method for the intended result.
Mistake 3: Adding Too Much Flour
Excess flour absorbs moisture and can create dry, crumbly cookies.
Solution: Weigh the flour whenever possible. If using cups, spoon the flour into the cup and level it rather than packing it tightly.
Mistake 4: Overmixing the Dough
Mixing the dough for too long after adding flour can produce a tougher texture.
Solution: Fold the ingredients together only until the flour is incorporated.
Mistake 5: Baking at the Wrong Temperature
Incorrect oven temperature can affect spreading, browning, and doneness.
Solution: Preheat the oven fully and use an oven thermometer if necessary.
Mistake 6: Removing Cookies Too Soon
Warm cookies are delicate and may break if moved immediately.
Solution: Leave them on the tray for 8–10 minutes before transferring them to a cooling rack.
Mistake 7: Baking All Cookies on a Hot Tray
A hot tray begins melting the dough before the oven can set the cookie structure.
Solution: Let the baking tray cool between batches.
Mistake 8: Using Only Large Chocolate Chunks
Large chunks provide delicious pockets of chocolate but may leave other areas of the cookie with little chocolate.
Solution: Combine chocolate chips with chopped chocolate for a more even distribution.
Mistake 9: Overcrowding the Tray
Cookies need room to spread. If they are placed too close together, they may merge during baking.
Solution: Leave approximately 7–8 cm between large dough portions and bake in batches when necessary.
Mistake 10: Storing Cookies While They Are Warm
Warm cookies release moisture. If placed in a sealed container immediately, condensation may develop and affect their texture.
Solution: Allow the cookies to cool completely before storing them.
Recipe Variations
Once you understand the basic method, you can adapt the recipe to suit different tastes.
Double Chocolate Chip Cookies
For a richer chocolate flavor, replace approximately 25–30 grams of the flour with unsweetened cocoa powder.
Add chocolate chips as usual.
Because cocoa powder absorbs moisture differently from flour, avoid making large changes to the quantities on your first attempt. The dough may require minor adjustments depending on the cocoa powder used.
Walnut Chocolate Chip Cookies
Add approximately 75 grams of chopped walnuts to the dough.
Walnuts provide a pleasant crunch and balance the sweetness of the chocolate.
Toast the walnuts lightly before adding them if you prefer a deeper nutty flavor. Allow them to cool completely first.
Sea Salt Chocolate Chip Cookies
Sprinkle a small amount of flaky sea salt over the dough portions immediately before baking.
The salt creates a contrast with the sweet chocolate and buttery dough.
Use a light hand, especially if you are already using salted butter.
Peanut Butter Chocolate Chip Cookies
Replace approximately 30–40 grams of the butter with smooth peanut butter.
Because peanut butter changes the dough’s fat and moisture balance, the texture may differ from the original recipe. Start with a small substitution rather than replacing all the butter.
Peanut butter also contains ingredients that vary by brand, so the dough may require slight adjustments.
Chocolate and White Chocolate Cookies
Use a mixture of semi-sweet chocolate chips and white chocolate chunks.
The contrasting colors create an attractive appearance, and the white chocolate adds sweetness.
If you use a large quantity of white chocolate, consider reducing the other sweet ingredients slightly according to your taste.
Coffee Chocolate Chip Cookies
Add approximately 1 teaspoon of instant espresso powder to the dry ingredients.
Coffee can deepen the perceived flavor of chocolate without necessarily making the cookies taste strongly of coffee.
This variation is particularly suitable for people who enjoy dark chocolate.
Mini Chocolate Chip Cookies
Divide the dough into smaller portions of approximately 20–25 grams.
Bake for a shorter period, beginning to check them after 7–9 minutes.
Mini cookies can brown quickly, so watch them carefully and remove them when the edges are set.
Bakery-Style Chocolate Chunk Cookies
Instead of using only chocolate chips, chop a chocolate bar into pieces of different sizes.
Use smaller pieces inside the dough and larger pieces on top.
This creates the irregular chocolate pockets that many people associate with bakery cookies.
How to Store Homemade Chocolate Chip Cookies
Correct storage helps maintain the flavor and texture of your homemade cookies.
Storing at Room Temperature
Once the cookies have cooled completely, place them in an airtight container.
Keep the container in a cool, dry location away from sunlight and heat.
For the best texture, enjoy the cookies within approximately 3–5 days. They may remain acceptable for longer under suitable conditions, but quality can gradually decline.
Avoid storing cookies in an open bowl for several days because exposure to air can dry them out.
Refrigerating Baked Cookies
Refrigeration is generally unnecessary for ordinary baked chocolate chip cookies if they are properly baked and stored in a clean, airtight container.
Refrigerator air can dry out cookies, and cold storage may make the chocolate and butter firmer.
If you choose to refrigerate them, seal them carefully and bring them toward room temperature before serving.
Freezing Baked Cookies
Freezing is useful when you want to prepare cookies in advance.
Allow the cookies to cool completely.
Place them in a freezer-safe container or bag, separating layers with parchment paper if needed.
Remove as much excess air as practical before sealing.
For best quality, use frozen cookies within approximately 2–3 months.
Thaw them at room temperature while covered. You can also warm them briefly in the oven to restore a freshly baked feel.
Freezing Cookie Dough
You can also freeze unbaked dough portions.
Shape the dough into individual balls and place them on a lined tray. Freeze until firm, then transfer them to a labeled freezer-safe bag or container.
Freezing the portions separately makes it easy to bake only the number of cookies you need.
For best quality, aim to use frozen dough within approximately 2–3 months.
You can often bake dough portions directly from frozen, adding a few minutes to the baking time. Check that the edges are set and the centers have reached the desired doneness.
How to Prepare Cookie Dough Ahead of Time
Preparing cookie dough ahead of time makes baking more convenient, especially when you have guests or want fresh cookies without completing every preparation step on the same day.
Refrigerating Dough Overnight
Prepare the dough according to the recipe.
Cover it tightly or place it in an airtight container.
Refrigerate for up to approximately 2–3 days for best quality, following safe food-handling practices because the dough contains raw egg.
When ready to bake, portion the dough if you have not already done so. If it is very firm, let it soften briefly at room temperature before shaping.
Bake using the recommended temperature and adjust the timing according to the size and temperature of the dough portions.
Preparing Dough for Special Occasions
For birthdays, family gatherings, or celebrations, you can prepare the dough a day ahead and bake it shortly before serving.
Another convenient option is to freeze individual dough portions.
This makes it easier to bake a small batch whenever you want fresh cookies.
Always label stored dough with the preparation date, and avoid tasting raw cookie dough because uncooked flour and raw eggs can contain harmful microorganisms.
How to Make Bakery-Style Cookies Without a Stand Mixer
A stand mixer is convenient, but it is not essential.
Place the softened butter and sugars in a large bowl.
Use a sturdy wooden spoon or spatula to mix them until creamy and evenly combined. This may take several minutes.
Add the egg, egg yolk, and vanilla, then stir until smooth.
Gradually fold in the dry ingredients.
Finally, add the chocolate chips and mix gently.
The important factor is not the equipment but the consistency of the ingredients and the way you combine them.
Avoid using a spoon that is too small or flexible, as thick dough can be difficult to mix evenly.
If the dough becomes difficult to handle, scrape it together with a firm spatula and chill it before shaping.
Can You Make These Cookies Without an Oven?
Yes, chocolate chip cookies can be prepared on a stovetop, although the texture and browning may differ from oven-baked cookies.
A heavy-bottomed pan with a tightly fitting lid can help trap heat. Use very low heat and place a suitable heat diffuser underneath the pan if available.
Line the pan with parchment only if the material and arrangement are appropriate for the cooking method and cannot contact a flame. Never allow parchment paper to extend beyond the pan or touch a gas flame.
Place small portions of dough in the pan with enough space between them. Cover and cook slowly, checking regularly to prevent the bottoms from burning.
Stovetop cookies may develop a more browned underside and a less evenly colored top because heat comes primarily from below.
For the most consistent bakery-style results, an oven is preferable. If you do not have one, use a stovetop-specific recipe that has been tested for your particular pan and cooking setup.
Nutritional Information
The nutritional values below are estimates and depend on the brands and quantities of ingredients used.
For the full batch of approximately 12 large cookies, the average cookie may contain roughly:
| Nutrient | Estimated amount per cookie |
|---|---|
| Calories | 350–390 kcal |
| Carbohydrates | 40–45 g |
| Fat | 18–22 g |
| Protein | 4–5 g |
| Sugar | 23–28 g |
These estimates assume the batch is divided into 12 large cookies. Smaller cookies will contain less energy per serving.
The exact values depend on the type of chocolate, butter, flour, and sugar used. For precise nutritional information, calculate the values using the labels of your specific ingredients and the actual number of cookies produced.
These cookies are a sweet treat rather than a nutritionally balanced meal. Enjoying them in moderate portions can help you fit them into your preferred eating pattern.
Frequently Asked Questions
1. What Is the Secret to Bakery-Style Chocolate Chip Cookies?
The main factors are accurate ingredient measurements, properly softened butter, a balanced combination of brown and white sugar, chilled dough, and careful baking.
Using chocolate chunks and allowing the cookies to rest on the tray also helps improve their appearance and texture.
2. Why Are My Chocolate Chip Cookies Flat?
Cookies may become flat if the butter is too warm, the dough is not chilled, the flour is undermeasured, or the oven temperature is too low.
Measure the ingredients carefully, chill the dough, and ensure the oven has reached the correct temperature before baking.
3. How Long Should I Chill Chocolate Chip Cookie Dough?
Chill the dough for at least 1 hour for this recipe. Chilling for 2–4 hours can also work well.
If you prepare the dough in advance, keep it covered in the refrigerator and follow safe storage practices.
4. Can I Use Salted Butter Instead of Unsalted Butter?
Yes. Salted butter can be used, but the final flavor will depend on how much salt the butter contains.
Reduce or omit the additional salt if necessary to avoid making the cookies too salty.
5. Can I Use Brown Sugar Only?
You can experiment with using only brown sugar, but the cookies will have a different texture and spreading pattern.
The combination of brown sugar and white sugar in this recipe is intended to balance chewiness, sweetness, and crisp edges.
6. Why Are My Cookies Hard After Cooling?
Overbaking is one of the most common causes of hard cookies. Too much flour can also make them dry.
Remove the cookies when the edges are set and the centers are slightly soft. Measure the flour accurately and store the cooled cookies in an airtight container.
7. Can I Make the Dough Without Eggs?
Yes, but replacing eggs changes the recipe’s structure and moisture.
You can try a tested eggless chocolate chip cookie recipe using an appropriate egg substitute. Simply removing the eggs from this recipe without replacing their function may produce dry or crumbly cookies.
8. Can I Use Self-Raising Flour?
You can use self-raising flour, but it already contains raising agents. Using it with the full quantities of baking soda and baking powder in this recipe may change the texture.
For the most predictable results, use all-purpose flour and follow the specified raising-agent measurements.
9. How Do I Know When the Cookies Are Done?
The edges should be set and lightly golden, while the centers remain slightly soft.
Large cookies usually take approximately 11–14 minutes at 175°C (350°F), but oven performance and portion size can change the timing.
10. Can I Freeze the Cookie Dough?
Yes. Shape the dough into portions, freeze them until firm, and store them in a sealed freezer-safe container or bag.
For best quality, aim to use the frozen dough within approximately 2–3 months. Adjust the baking time when baking from frozen.
11. What Chocolate Is Best for Homemade Cookies?
Semi-sweet chocolate chips are a reliable option. Dark chocolate chunks create a richer flavor, while milk chocolate produces sweeter cookies.
Combining chocolate chips and chopped chocolate can provide both an even distribution and attractive melted pockets.
12. Can I Make Smaller Cookies With This Recipe?
Yes. Divide the dough into 40–45 gram portions for medium cookies or 20–25 gram portions for mini cookies.
Smaller cookies require less baking time, so check them earlier than the large cookies.
13. Why Do My Cookies Burn on the Bottom?
Your baking tray may be too dark, the oven may be too hot, or the tray may be positioned too close to the lower heating element.
Try using a light-colored baking tray, placing it in the center of the oven, and checking the oven temperature with a thermometer.
14. Can I Use Oil Instead of Butter?
Oil can be used in some cookie recipes, but it behaves differently from butter and does not provide the same flavor or creaming properties.
For this bakery-style recipe, butter is recommended. If you need an oil-based version, use a recipe designed specifically for oil.
15. How Can I Make My Cookies Look Like Professional Bakery Cookies?
Use evenly sized dough portions, keep the dough chilled, and press a few extra chocolate chunks onto the tops before baking.
Avoid overbaking, allow the cookies to rest on the tray, and use a round cookie cutter or large circular cup to gently shape their edges immediately after baking if necessary. Do this carefully while the cookies are still hot and soft.
16. Can I Bake the Cookies on a Silicone Mat?
Yes. A silicone baking mat can be used on a suitable baking tray.
However, silicone mats may produce slightly different spreading and browning compared with parchment paper. Use one baking surface consistently if you want to compare results between batches.
17. How Many Cookies Does This Recipe Make?
This recipe makes approximately 12 large cookies or 16 medium cookies. The final number depends on how much dough you use for each portion.
18. Can I Make the Cookies Less Sweet?
You can experiment with slightly reducing the sugar or choosing darker chocolate.
However, sugar affects spreading, moisture, browning, and texture, so reducing it substantially may change the finished cookies. Make small adjustments and evaluate the results.
19. Why Are My Cookies Raw in the Middle?
The cookies may be too large, the oven may be too hot, or the baking time may be insufficient.
Check the oven temperature, use consistent dough portions, and allow additional baking time when necessary. The center should be soft but not visibly wet or raw.
20. What Is the Best Way to Reheat Chocolate Chip Cookies?
Place an individual cookie in the microwave for approximately 5–10 seconds, checking carefully to avoid overheating.
Alternatively, warm the cookie in a preheated oven at a low temperature for a few minutes. Allow it to cool briefly before eating because melted chocolate can become very hot.
Final Thoughts
Making bakery-style chocolate chip cookies at home becomes much easier when you understand how the ingredients work together. Properly softened butter, accurate flour measurements, a combination of brown and white sugar, and chilled dough all contribute to the final texture.
The most important step is to avoid overbaking. Remove the cookies when the edges are golden and the centers remain slightly soft, then allow them to rest on the baking tray before transferring them to a cooling rack.
With a little practice, you can adjust the chocolate, cookie size, and baking time to create a version that suits your taste. Whether you serve them warm with a glass of milk, share them with family, or freeze portions of dough for later, these homemade chocolate chip cookies are a practical recipe to keep in your kitchen.