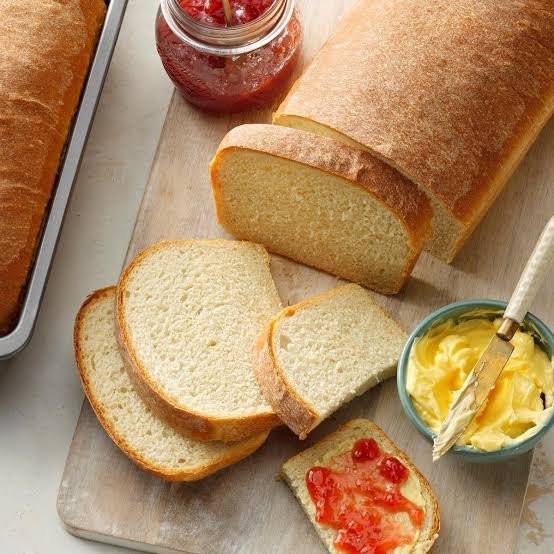
Making homemade bread without a bread machine is easier than many people think. With a few basic kitchen ingredients, a mixing bowl, and a regular oven, you can prepare a soft, fluffy loaf with a golden crust right in your own kitchen. This homemade bread recipe is suitable for beginners, families, and anyone who wants fresh bread without buying special equipment.
You do not need an expensive stand mixer or a bread-making machine. A little patience, proper kneading, and enough time for the dough to rise are the main secrets to success.
This guide explains how to make homemade bread without a bread machine, including the ingredients, preparation steps, kneading techniques, baking instructions, troubleshooting tips, storage methods, and useful variations.


Recipe Overview
- Recipe name: Homemade Bread Without a Bread Machine
- Preparation time: 25–30 minutes
- Rising time: 1½–2 hours, depending on room temperature
- Baking time: 30–35 minutes
- Total time: Approximately 2½–3 hours
- Yield: One medium loaf
- Difficulty: Beginner-friendly
- Cooking method: Oven baking
- Best for: Sandwiches, toast, breakfast, lunch, and snacks
The total time includes resting and rising. Most of that time does not require active work, so you can prepare other things while the dough rises.
Why Make Homemade Bread Without a Bread Machine?
Homemade bread offers several advantages over packaged bread. You can control the ingredients, adjust the flavor, choose your preferred flour, and avoid purchasing equipment you may not need.
1. You Only Need Basic Kitchen Equipment
A mixing bowl, measuring tools, a clean surface for kneading, and a loaf pan are enough. If you do not have a loaf pan, you can shape the dough into a round loaf and bake it on a suitable baking tray.
2. You Control the Ingredients
Commercial bread recipes can contain different additives, preservatives, sweeteners, and oils depending on the product. When you make bread at home, you decide what goes into it.
You can use all-purpose flour or bread flour, adjust the salt, and choose whether to add sugar, milk, butter, or oil.
3. Fresh Bread Tastes Better
Freshly baked bread has a pleasant aroma, a golden crust, and a soft interior. It is delicious when served with butter, jam, eggs, soup, or your favorite sandwich fillings.
4. It Can Be Budget-Friendly
Flour, yeast, water, salt, and a little sugar are often enough for a basic loaf. Buying ingredients in larger quantities can make homemade bread economical, particularly for households that regularly eat bread.
5. You Can Customize Every Loaf
Once you understand the basic method, you can experiment with whole-wheat flour, seeds, herbs, garlic, or other additions without changing the entire recipe.
Ingredients for Homemade Bread
The following quantities make one medium loaf.

| Ingredient | Quantity | Purpose |
|---|---|---|
| All-purpose flour or bread flour | 3 cups, approximately 360–390 g | Forms the bread structure |
| Warm water | 1 to 1¼ cups, approximately 240–300 ml | Hydrates the flour and activates the yeast |
| Instant yeast | 2¼ teaspoons, about 7 g | Helps the dough rise |
| Sugar | 1 tablespoon | Adds mild sweetness and supports browning |
| Salt | 1 teaspoon | Improves flavor and regulates fermentation |
| Cooking oil or melted butter | 1–2 tablespoons | Helps make the bread tender |
Important: Flour brands absorb water differently, so do not pour in all the water at once. Start with 1 cup and add more gradually if the dough feels dry.
If you use active dry yeast instead of instant yeast, you can dissolve it in warm water with the sugar and let it stand for about 5–10 minutes, until foamy. Follow the package instructions if they differ.
Equipment You Will Need
You do not need specialized bread-making equipment. Gather these items before starting:
- A large mixing bowl
- Measuring cups and spoons or a kitchen scale
- A wooden spoon or sturdy spatula
- A clean countertop or kneading board
- A loaf pan or baking tray
- A clean kitchen towel or reusable cover
- An oven
- A cooling rack, if available
If you do not have a cooling rack, place the baked loaf on a clean, heat-safe surface that allows some air to circulate around it.
Step 1: Prepare the Yeast
Yeast is responsible for producing the gas that makes bread rise. Correctly handling it is an important part of making soft homemade bread.
If you are using instant yeast, mix it directly with the flour or follow the directions on its package.
If you are using active dry yeast, place the warm water in a small bowl. Add the sugar and yeast, stir gently, and leave the mixture for 5–10 minutes.
The mixture may develop a foamy layer. This is a useful sign that the yeast is active, although some yeast products foam less noticeably than others.
What Temperature Should the Water Be?
Use comfortably warm water rather than hot water. Water that is too hot can damage or kill the yeast, while very cold water slows its activity.
If you have a thermometer, aim for approximately 38–43°C (100–110°F) when proofing active dry yeast, unless the yeast package recommends another range.
Do not worry if you do not have a thermometer. The water should feel warm, not hot, against your skin.
Step 2: Mix the Dry Ingredients
Place the flour in a large bowl. Add the salt and, if using instant yeast, the yeast. Stir the dry ingredients together so they are distributed evenly.
Add the sugar and mix again.
Keeping the salt evenly distributed helps prevent concentrated areas of salt from coming into direct contact with the yeast. Salt is essential for flavor and dough structure, but too much can slow yeast activity.
If you are using active dry yeast that has already been dissolved in water, add that mixture during the next step.
Step 3: Add the Water and Oil
Make a small well in the center of the flour mixture. Pour in the yeast mixture, or the warm water if using instant yeast, followed by the oil or melted butter.
Stir with a wooden spoon until the ingredients come together into a rough dough.
The dough may initially look sticky, uneven, or shaggy. This is normal. Give the flour a little time to absorb the water before deciding that more flour is needed.
If the dough is extremely dry and loose flour remains in the bowl, add water one tablespoon at a time. If it is very wet and cannot hold together, add flour gradually.
Avoid adding too much flour at this stage. A stiff dough often produces a dense loaf.
Step 4: Knead the Dough by Hand
Kneading develops gluten, a network of proteins that gives bread its structure and helps it rise. You can develop this structure without a stand mixer or bread machine.


7
How to Knead Bread Dough
- Lightly flour your work surface.
- Transfer the dough from the bowl to the surface.
- Push the dough away from you with the heel of your hand.
- Fold the far edge back toward the center.
- Turn the dough slightly and repeat.
- Continue kneading for approximately 8–10 minutes.
At first, the dough may feel sticky and uneven. As you continue kneading, it should become smoother and more elastic.
Use only a small amount of flour on the work surface. Adding too much flour can make the dough dry and the finished loaf heavy.
How to Know When the Dough Is Ready
Well-kneaded dough should generally be:
- Smooth rather than rough and lumpy.
- Soft and slightly tacky, but not excessively sticky.
- Elastic when gently stretched.
- Able to hold together as a single ball.
You can perform a simple stretch test. Take a small piece of dough and gently stretch it between your fingers. If it stretches into a thin membrane before tearing, gluten development is progressing well. The dough does not have to pass a perfect windowpane test to make a good homemade loaf.
What If the Dough Is Too Sticky?
Do not immediately add several tablespoons of flour. Lightly oil your hands or let the dough rest for five minutes before kneading again.
If it remains unmanageably wet, add flour one tablespoon at a time and knead it in completely before adding more.
What If the Dough Is Too Dry?
If the dough cracks, feels hard, or contains dry flour that will not incorporate, wet your hands and knead again. You can also add water a teaspoon or tablespoon at a time, depending on how dry it is.
The ideal dough should be soft enough to knead comfortably without sticking heavily to everything it touches.
Step 5: Let the Dough Rise
Place the kneaded dough in a lightly oiled bowl. Turn it once so that the surface has a thin coating of oil.
Cover the bowl with a clean kitchen towel, a reusable cover, or plastic wrap. Leave it in a warm, draft-free place until it has approximately doubled in size.
This first rise commonly takes 60–90 minutes, but it can take longer in a cool kitchen. The dough’s appearance matters more than following the clock exactly.
How to Create a Warm Place for Dough
If your kitchen is cool, try one of these methods:
- Place the covered bowl in a turned-off oven with the oven light on, if it creates only gentle warmth.
- Put the bowl in a warm part of the kitchen away from open windows.
- Set the bowl near, but not directly on, a mildly warm surface.
Avoid excessive heat. A very hot environment can damage yeast activity and cause the dough to rise too quickly.
How to Tell When the First Rise Is Complete
The dough should look noticeably larger, often close to twice its original size. When gently pressed with a floured fingertip, the indentation should slowly begin to recover.
If the dough springs back immediately, it may need more time. If it collapses easily and does not recover, it may have risen too far.
Do not rely on size alone. Temperature, flour type, yeast strength, and dough hydration all affect rising time.
Step 6: Shape the Bread
Once the dough has risen, gently press it to release some of the accumulated gas. Transfer it to a lightly floured work surface.
For a standard loaf pan, shape the dough into a rectangle approximately as wide as the pan.
Fold the top third toward the center, then fold the bottom third over it. Press the seam gently to seal it. Roll the dough into a compact loaf shape, tucking the ends underneath if necessary.
Place the shaped dough seam-side down in a lightly greased loaf pan.
If you do not have a loaf pan, shape the dough into a round ball and place it on a greased or parchment-lined baking tray suitable for oven use. A free-form loaf may spread more than one baked in a pan, so keep its shape reasonably tight.
Why Shaping Matters
Good shaping creates surface tension, helping the dough maintain its form as it rises and bakes. A loosely shaped loaf may spread outward rather than rising upward.
However, avoid pulling the surface so tightly that the dough tears. The aim is a smooth, even loaf with the seam securely tucked underneath.
Step 7: Complete the Second Rise
Cover the shaped dough loosely and let it rise again for approximately 30–45 minutes.
During this stage, the loaf should become visibly puffy. It may rise to the top of the loaf pan or slightly above it, depending on the pan size and dough quantity.
Avoid letting it rise so much that it becomes fragile and collapses when handled.
The Finger-Poke Test
Gently press the dough with a floured finger:
- If the indentation springs back immediately, give it more time.
- If it returns slowly and leaves a slight mark, it is usually ready to bake.
- If the indentation remains deeply and the dough deflates, it may be overproofed.
This test takes practice, but it is more reliable than using a fixed rising time for every kitchen.
Step 8: Preheat the Oven
Preheat your oven to 190°C (375°F).
Allow enough time for the oven to reach the correct temperature before placing the loaf inside. An oven that has not fully heated may affect the bread’s rise, crust, and baking time.
Position the rack near the center of the oven so the loaf receives reasonably even heat.
If your oven tends to brown food too quickly, check the bread during the later part of baking. You can tent the loaf loosely with foil if the top is getting too dark before the center is baked.
Step 9: Bake the Homemade Bread
Place the loaf pan in the preheated oven and bake for approximately 30–35 minutes.
The top should become golden brown, and the loaf should feel firm rather than soft and doughy. Exact baking time varies according to loaf size, pan material, and oven performance.
How to Check Whether Bread Is Fully Baked
Use several clues rather than relying on crust color alone:
- Appearance: The top should be golden brown.
- Structure: The loaf should feel set and hold its shape.
- Sound: A loaf removed from its pan may sound somewhat hollow when tapped on the bottom, though this is not a perfect test.
- Internal temperature: If you have a food thermometer, the center of a standard lean bread loaf is often around 93–96°C (200–205°F) when fully baked.
If the bread is still pale and soft, return it to the oven for several more minutes and check again.
Should You Brush the Top With Butter?
You can brush the crust with a little melted butter immediately after baking if you prefer a softer, more tender surface.
For a firmer crust, leave the loaf unbuttered and allow it to cool uncovered.
A light brushing of water before baking can also help the crust develop differently, but it is optional for this simple everyday loaf.
Step 10: Cool Before Slicing
Remove the loaf from the oven and allow it to stand in the pan for approximately 5–10 minutes. Carefully turn it out and place it on a cooling rack or another suitable surface.
Wait until the bread has cooled substantially before slicing. Ideally, allow at least 45–60 minutes for a medium loaf.
Freshly baked bread continues to release steam while cooling. Cutting it too early can compress the soft interior and leave the slices gummy or sticky.
If you need warm bread, you can serve it slightly warm, but allow enough time for the loaf’s structure to settle first.
The Complete Recipe at a Glance

Homemade Everyday Bread
One medium loaf · No bread machine required
Soft, versatile bread for toast and sandwiches.
Ingredients checklist
3 cups (360–390 g) flour1–1¼ cups (240–300 ml) warm water2¼ teaspoons (7 g) instant yeast1 tablespoon sugar1 teaspoon salt1–2 tablespoons oil or melted butter
0 of 6 ingredients readyCopy recipe
Expert Tips for Soft and Fluffy Homemade Bread
The ingredients are simple, but a few small details can make a significant difference in the finished loaf.
1. Measure the Flour Carefully
Too much flour is one of the most common reasons homemade bread becomes dry and dense. If you use measuring cups, spoon the flour into the cup and level it instead of packing it down tightly.
A kitchen scale is even more reliable because flour volume varies with how it is scooped and settled.
2. Add Water Gradually
Start with the lower amount of water listed in the recipe. Add more as needed until the dough becomes soft and manageable.
The flour should absorb enough moisture to create an elastic dough. The correct amount depends on the flour, humidity, and measuring method.
3. Knead for Long Enough
Under-kneaded dough may have a weak structure and produce a loaf that does not rise well. Kneading for approximately 8–10 minutes by hand is a good starting point.
The dough should become smoother and more elastic. If it remains very rough, give it additional kneading time.
4. Give the Dough Enough Time to Rise
Bread dough needs time to ferment. Rushing the process may result in a smaller, denser loaf.
On a cold day, rising can take considerably longer than expected. Use the appearance and feel of the dough to determine when it is ready rather than relying entirely on the clock.
5. Use Fresh, Active Yeast
Old or improperly stored yeast may be less effective. Check the package’s expiration date and storage instructions.
If your active dry yeast does not show signs of activity after being mixed with warm water and sugar, check the temperature and freshness before continuing.
6. Avoid Adding Too Much Sugar
A small amount of sugar improves flavor and encourages browning. However, ordinary bread does not need to be very sweet.
For a less sweet loaf, you can reduce the sugar. Keep in mind that sugar, flour type, and other ingredients influence browning and fermentation.
7. Allow the Oven to Preheat Properly
Putting bread into an insufficiently heated oven can affect the final rise and crust development. Wait until the oven has reached 190°C (375°F).
If you bake regularly, an inexpensive oven thermometer can help identify differences between the displayed temperature and the actual oven temperature.
8. Let the Loaf Cool Properly
Cooling is part of the bread-making process, not an optional extra. Slicing too soon can make the interior appear sticky even when the loaf is fully baked.
Use a serrated bread knife and a gentle sawing motion to create neat slices without crushing the loaf.
Common Homemade Bread Problems and How to Fix Them
Even experienced home bakers occasionally have problems with bread. Understanding the cause helps you improve the next loaf.
| Problem | Possible cause | How to improve it |
|---|---|---|
| Bread is dense | Too much flour, weak yeast, or insufficient kneading | Measure carefully, check yeast, and knead until elastic |
| Dough does not rise | Inactive yeast or a cold environment | Check yeast freshness and allow more time in a warm place |
| Dough is too sticky | High hydration or insufficient gluten development | Rest and knead first; add flour gradually only if necessary |
| Bread collapses after rising | Overproofing or weak dough structure | Shorten the second rise and handle the dough gently |
| Crust becomes too dark | Oven is too hot or loaf bakes too long | Check oven temperature and tent with foil if necessary |
| Interior is gummy | Bread is underbaked or sliced while hot | Check doneness and cool before slicing |
| Loaf is dry | Too much flour or excessive baking | Measure flour accurately and check earlier |
| Bread spreads sideways | Loose shaping or weak dough | Knead adequately and shape the loaf more firmly |
| Crust is too hard | Baking conditions or a crust style that is too firm for your preference | Brush with butter after baking and cool under a clean towel briefly |
Why Is My Bread Dense Instead of Fluffy?
A dense loaf often results from excess flour, insufficient kneading, inactive yeast, or inadequate rising time.
Start by checking your measurements. If you add flour whenever the dough feels slightly sticky, you may end up with a dough that is too stiff.
Also check whether the dough actually doubles during the first rise. If it barely grows, give it more time or investigate whether the yeast is active.
Why Does My Bread Smell Strongly of Yeast?
A strong yeast aroma can result from the amount of yeast used, fermentation conditions, or insufficient baking. Check your measurements and allow the dough to rise until ready rather than forcing it through a rushed process.
A mild yeasty aroma is normal in homemade bread.
Why Is the Middle of My Bread Undercooked?
The crust may brown before the center has finished baking. This can happen if the oven is too hot, the loaf is unusually large, or the baking time is too short.
Reduce the oven temperature slightly if necessary and extend the baking time. A thermometer is useful for checking the center without guessing.
Easy Variations of Homemade Bread
Once you can make a basic loaf, you can adapt it to suit your family’s preferences.


8
1. Whole-Wheat Homemade Bread
Replace some of the all-purpose flour with whole-wheat flour.
For a beginner-friendly version, use 2 cups of all-purpose flour and 1 cup of whole-wheat flour. You may need a little extra water because whole-wheat flour absorbs moisture differently.
Whole-wheat bread tends to be denser than white bread, so allow the dough enough time to rise. Avoid replacing all the flour at once until you are comfortable adjusting hydration and kneading.
2. Milk Bread
Replace part or all of the water with milk for a softer, slightly richer loaf.
Use milk that is warm rather than hot. If you add milk, remember that dairy ingredients may change browning and texture. You can also add a small amount of butter for a more tender crumb.
3. Garlic and Herb Bread
Add approximately 1–2 teaspoons of dried herbs, such as oregano or rosemary, to the flour mixture.
For a garlic flavor, use a small quantity of garlic powder or incorporate finely minced cooked garlic. Raw garlic can affect the dough’s moisture and flavor, so avoid adding excessive amounts.
This version is excellent alongside soup, pasta, or roasted vegetables.
4. Seeded Bread
Add a few tablespoons of sunflower seeds, sesame seeds, pumpkin seeds, or flaxseed.
For better distribution, mix the seeds into the dough during the later part of kneading. If the dough becomes dry, add a little water as needed.
You can also sprinkle seeds over the top before baking. Lightly wet the surface first so the seeds are more likely to stick.
5. Slightly Sweet Breakfast Bread
For a mildly sweet loaf, increase the sugar modestly and add a little cinnamon if desired.
A few raisins can also work well. Fold them into the dough near the end of kneading so they are distributed evenly.
This version is useful for breakfast toast and can be served with butter, jam, or fruit.
6. Oil-Free Bread
You can omit the oil or butter if you prefer a leaner loaf. The bread will still bake successfully, but the texture may be less tender and the bread may stale more quickly.
Keep the water amount flexible and pay attention to the dough’s texture.
7. Small Dinner Rolls
Instead of shaping one loaf, divide the dough into 8–10 similarly sized pieces.
Shape each piece into a smooth ball and place the rolls on a greased or parchment-lined baking tray with space between them. Let them rise until puffy, then bake at 190°C (375°F), checking after about 15–20 minutes.
Smaller rolls generally bake faster than a full loaf.
8. No-Loaf-Pan Round Bread
If you do not own a loaf pan, shape the dough into a firm round ball. Place it on a baking tray, allow the second rise, and bake until golden and cooked through.
The shape will resemble a rustic country loaf rather than a uniform sandwich loaf. Baking time may vary according to its thickness, so check the center before removing it.
How to Store Homemade Bread
Homemade bread contains no guarantee of the same shelf life as commercially packaged bread. Its storage time depends on moisture, temperature, ingredients, and kitchen conditions.
Storing at Room Temperature
Allow the loaf to cool completely before storing it. Place it in a clean bread bag, airtight container, or suitable bread box.
For the best texture, many homemade loaves are enjoyed within 2–3 days. In hot or humid conditions, bread may spoil faster, so check it regularly.
Avoid sealing bread while it is still warm. Trapped steam can create excess moisture and encourage spoilage.
Can You Store Homemade Bread in the Refrigerator?
Refrigeration can slow mold growth, but it also tends to make bread stale faster. For everyday storage, a suitable room-temperature container or freezing is often preferable, provided the environment is cool and dry enough.
If your kitchen is very hot or humid, prioritize food safety and choose a storage method that protects the bread from spoilage.
How to Freeze Homemade Bread
Freezing is a useful way to preserve extra bread.
- Allow the loaf to cool completely.
- Slice it if you want to remove individual portions.
- Wrap the bread well or place it in a freezer-safe bag.
- Remove as much excess air as practical.
- Label the bag with the date and place it in the freezer.
For best quality, use frozen homemade bread within about 2–3 months.
You can toast frozen slices directly or thaw them in a covered container. If thawing a whole loaf, let it defrost before slicing.
How to Tell Whether Homemade Bread Has Spoiled
Discard the loaf if you notice mold, an unusual odor, or unexpected changes in appearance or texture. Do not simply cut the visible mold off and eat the remaining bread, because mold can extend beyond the areas you can see.
Keep bread utensils and storage containers clean, and avoid placing a fresh loaf on a surface contaminated with crumbs or moisture from older bread.
How to Serve Homemade Bread
One advantage of this recipe is its versatility. A single loaf can be used for several meals throughout the day.


7
Breakfast Ideas
Serve toasted slices with butter, honey, jam, peanut butter, or scrambled eggs. You can also make French toast by dipping slices in an egg-and-milk mixture and cooking them in a lightly greased pan.
Lunch Ideas
Use the bread to prepare chicken sandwiches, vegetable sandwiches, cheese toasties, or simple egg sandwiches. Slice it evenly so the fillings stay in place.
Dinner Ideas
Serve fresh bread with soup, pasta, salads, or cooked vegetables. Toasted slices brushed with garlic butter make a simple side dish.
Snack Ideas
Make cinnamon toast, cheese toast, or small open sandwiches with your favorite toppings. Slightly stale bread can also be cut into cubes and toasted to make homemade croutons.
Frequently Asked Questions
1. Can I make homemade bread without a bread machine?
Yes. A bread machine is not necessary. You can mix the ingredients in a bowl, knead the dough by hand, allow it to rise, shape it, and bake it in a regular oven.
The main difference is that you perform the mixing, kneading, and shaping yourself.
2. Can I make bread without a stand mixer?
Yes. Hand-kneading is a reliable method for this recipe. Knead the dough for approximately 8–10 minutes, or until it becomes smooth and elastic.
If kneading is difficult, allow the dough to rest for five minutes and continue. Short rests can make the dough easier to handle.
3. Can I use all-purpose flour instead of bread flour?
Yes. All-purpose flour works well for everyday homemade bread. Bread flour generally contains more protein, which can help develop a stronger gluten structure.
If you use all-purpose flour, focus on proper kneading and avoid adding excessive flour.
4. Can I make homemade bread without sugar?
Yes. You can omit the sugar from this recipe. The yeast can still ferment using sugars produced from the flour’s starches.
However, sugar contributes to flavor and browning, so the crust and overall taste may be slightly different.
5. Can I use active dry yeast instead of instant yeast?
Yes. Use approximately the same quantity for this recipe unless your package specifies otherwise. Dissolve active dry yeast in warm water with the sugar and leave it for about 5–10 minutes before mixing it with the flour.
Check the package instructions because yeast products can vary.
6. How long should homemade bread dough rise?
The first rise commonly takes 60–90 minutes, and the second rise often takes 30–45 minutes. These are estimates rather than strict limits.
A cool room can slow fermentation, while a warm room can speed it up. Wait until the dough is visibly expanded and appropriately puffy.
7. Why is my homemade bread not soft?
Bread may become firm or dense if too much flour is used, the dough is under-kneaded, or the loaf is baked for too long.
Measure the flour carefully, add water gradually, and avoid extending the baking time unnecessarily. Brushing the crust with a little butter after baking can also make the surface softer.
8. Can I make this recipe without a loaf pan?
Yes. Shape the dough into a round loaf and place it on a suitable baking tray. Allow it to rise for the second time before baking.
A round loaf may have a different shape and bake at a different rate from a loaf-pan bread, so check its doneness carefully.
9. How do I know when homemade bread is fully baked?
Look for a golden-brown crust and a loaf that feels firm. A thermometer inserted into the center can provide a more reliable check; many standard lean loaves reach approximately 93–96°C (200–205°F) when baked through.
If the center remains doughy, continue baking and check again.
10. Can I make the dough ahead of time?
Yes. You can refrigerate bread dough for a slower rise, provided it is covered well. Cold fermentation takes longer, and the dough may need additional time at room temperature before shaping or baking.
Because refrigerator temperatures and yeast activity vary, judge readiness by the dough’s condition rather than following a fixed schedule.
11. Can I use whole-wheat flour for this recipe?
Yes. Begin by replacing about one-third of the all-purpose flour with whole-wheat flour. You may need additional water, and the finished loaf will generally be denser than bread made entirely with white flour.
This gradual approach makes it easier to learn how whole-wheat flour changes the dough.
12. Why did my bread collapse after rising?
Bread may collapse if it rises too long, has a weak gluten structure, or is handled roughly after proofing. Make sure the dough is adequately kneaded and bake it when the second rise is complete rather than waiting for it to become excessively swollen.
13. How many slices can I get from one loaf?
A medium loaf usually produces approximately 10–14 slices, depending on its size and how thickly you cut it.
Allowing the loaf to cool before slicing helps you make cleaner, more even pieces.
14. Is homemade bread cheaper than store-bought bread?
It can be, especially when flour and yeast are purchased economically and bread is prepared regularly. However, the final cost depends on local ingredient prices, electricity or gas, and the type of bread being compared.
For an accurate comparison, calculate the ingredient and baking costs for one loaf in your own kitchen.
15. Can I make homemade bread without eggs?
Yes. This basic recipe does not contain eggs. It uses flour, water, yeast, sugar, salt, and oil or butter.
Eggs are not required to make a traditional everyday loaf rise and develop its structure.
Final Thoughts
Making homemade bread without a bread machine is a practical skill that anyone can learn with a little practice. You only need basic ingredients, a mixing bowl, your hands, and a regular oven to create a fresh loaf for your family.
The most important steps are measuring the flour carefully, adding enough water to make a soft dough, kneading until it becomes elastic, allowing enough time for both rises, and baking until the center is fully cooked.
Start with the basic recipe before experimenting with whole-wheat flour, herbs, seeds, or milk. Once you understand how the dough should look and feel, you can adjust the recipe to suit your taste and household needs.
Whether you serve it with breakfast, make sandwiches for lunch, or enjoy warm slices with dinner, homemade bread is a useful, versatile addition to your kitchen.